Try out your website in the spatial web
Now that visionOS 2 is announced, it’s a great time to ensure your website works in Safari in visionOS. For the most part, there’s nothing special you need to do for the spatial web. It’s truly Safari, with the same WebKit engine and its extensive support for web standards.
You can see how Safari in visionOS works by watching the Apple Vision Pro introduction at the WWDC23 Keynote or the session Meet Safari for spatial computing. If you don’t have your own Apple Vision Pro, and you want to experience what it’s like in person, you can book a free demo of Apple Vision Pro at your local Apple Store (in available regions).
Let’s take a look at how to use Safari’s suite of developer tools to test, inspect, and debug your site. First, you’ll learn how to use Safari developer tools with the visionOS simulator. Then, you’ll get a walkthrough of pairing Safari and Web Inspector on your Mac with Apple Vision Pro. These instructions work with for visionOS 1.2 and visionOS 2 so you can debug even if you do not have an Apple developer account.
Develop with the visionOS simulator
The Mac is a powerful machine — powerful enough to run macOS, iOS, watchOS, tvOS, visionOS, and iPadOS at the same time. It’s here where app developers work on their apps, write code, and test their code in the appropriate Simulator.
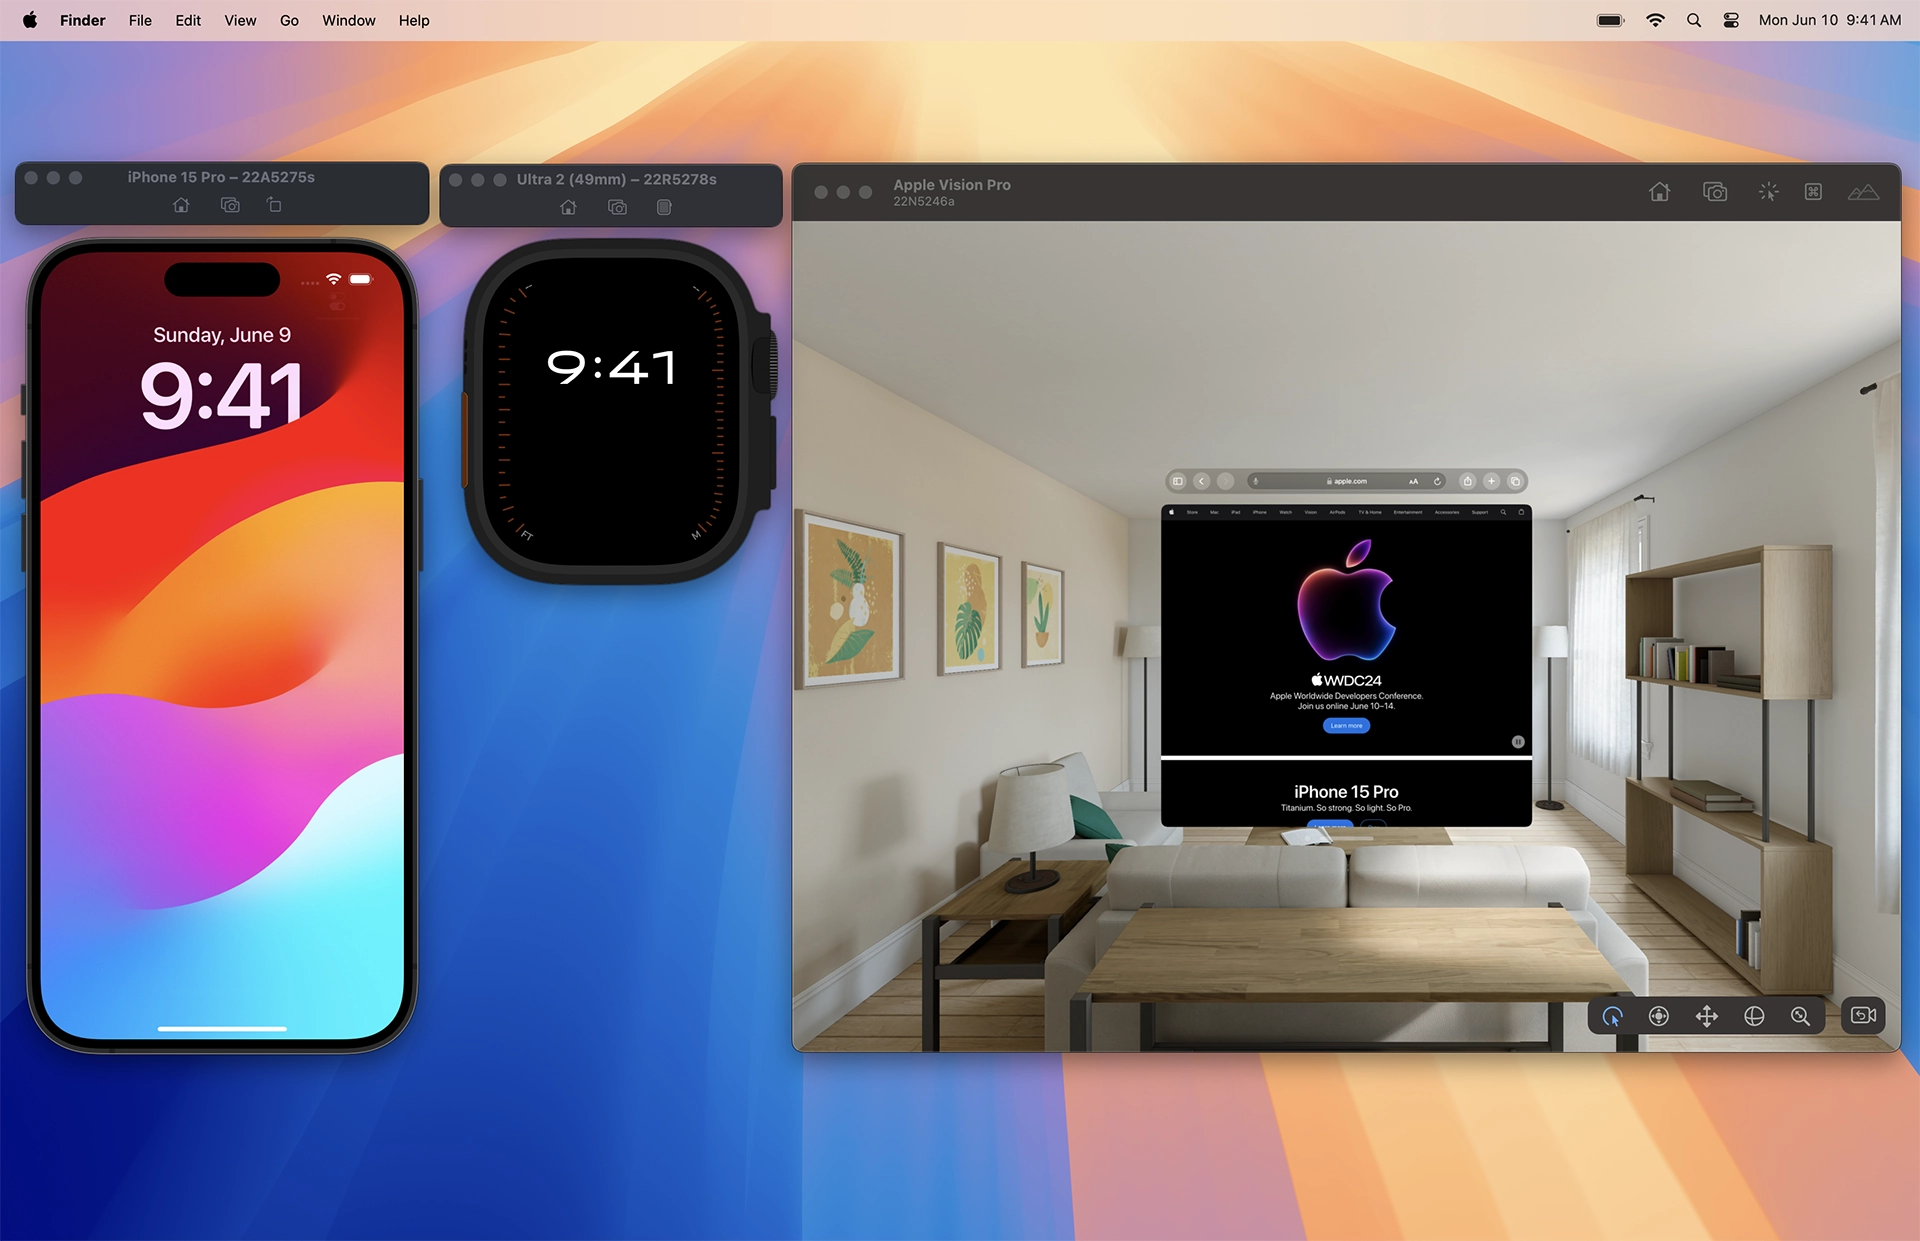
You can test the website you are building in Safari inside Simulator on macOS. This lets you develop the site on your Mac, using your full development environment, with your favorite IDE, Terminal, and more. When you’re ready to test, use Web Inspector on Mac to inspect web pages running in its simulator.

At WWDC24, Apple announced visionOS 2 beta available now to developers with an Apple Developer Program membership. Xcode 16 beta includes the visionOS 2 beta simulator with Safari 18 beta. Or test in visionOS 1.2 with Safari 17.5 by downloading Xcode 15 and installing its simulator.
Get setup
Here’s how to get started using the visionOS simulator:
- Download Xcode 15 from the Mac App Store. (It’s free.) Or download Xcode 15 or Xcode 16 beta from the Xcode website.
- Open Xcode. When asked which platforms you would like to develop for, enable visionOS. If you’d like to also install Simulator for iPhone and iPad, enable iOS.
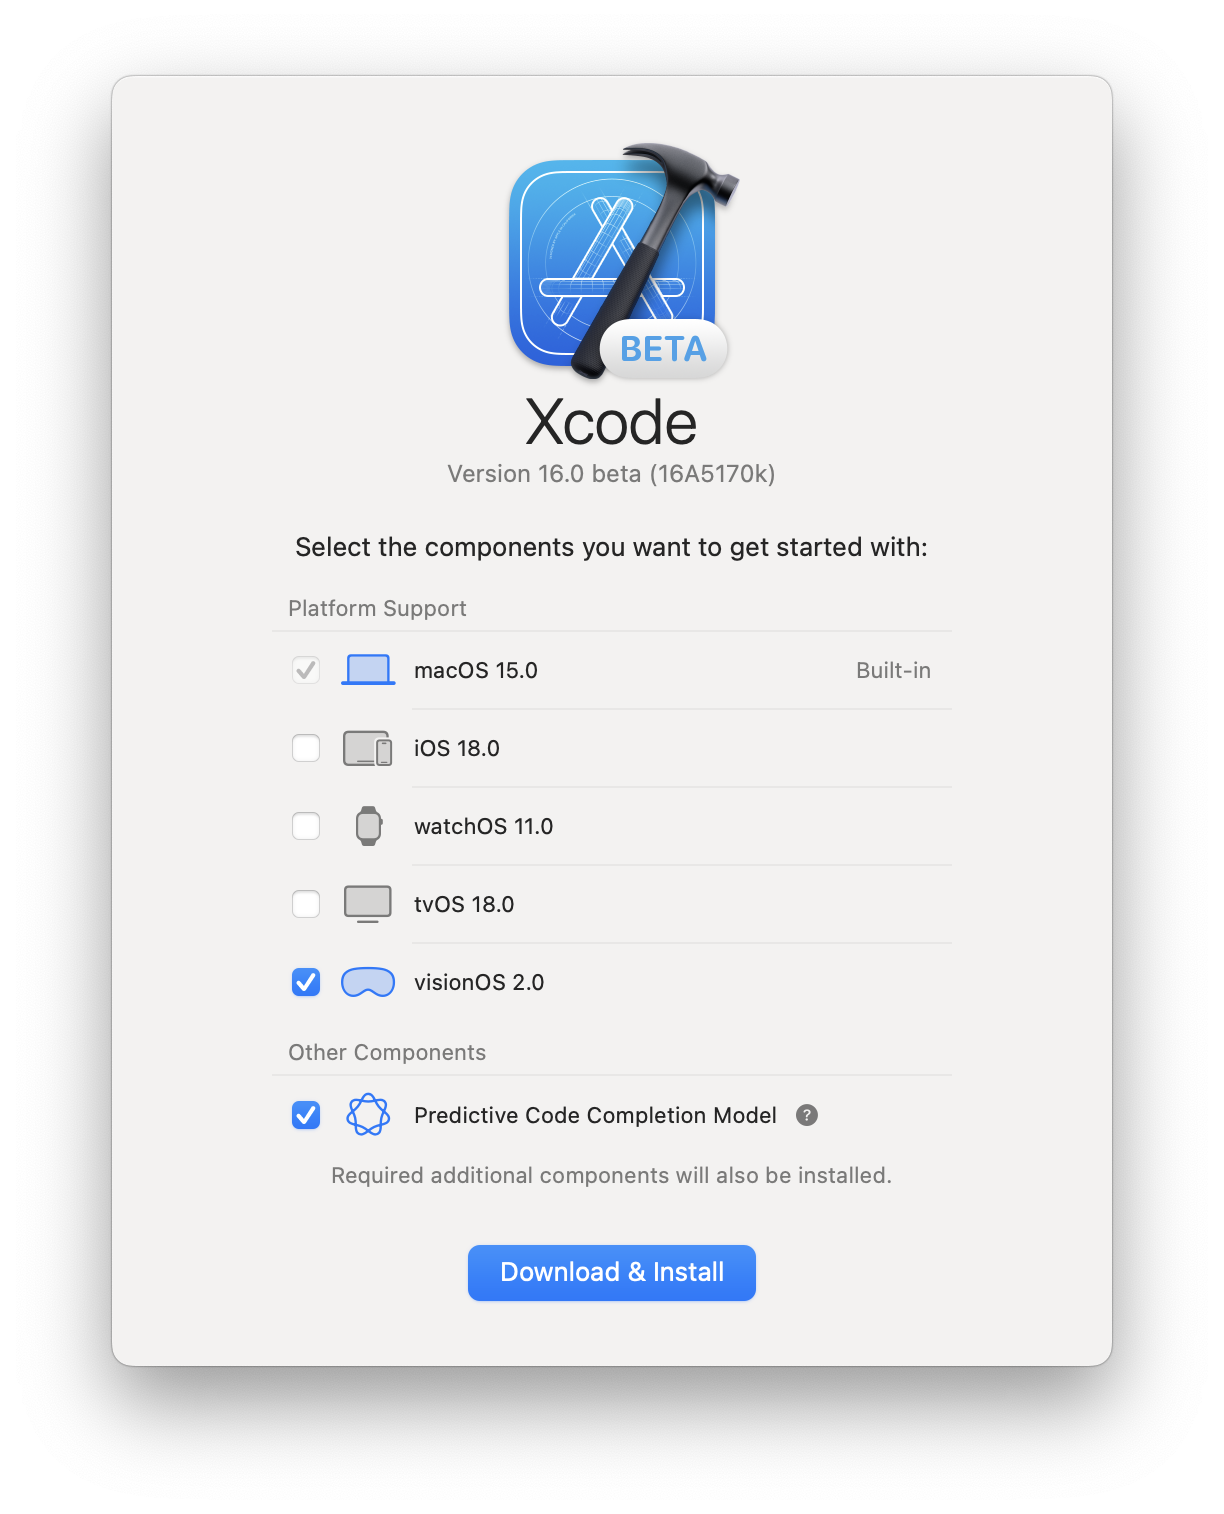
- The visionOS simulator will start downloading.
- Open the Simulator app on macOS. Xcode doesn’t need to be running to use Simulator.
- You will see a visionOS simulator named “Apple Vision Pro”.
- You can use the File menu anytime to create a new simulator or open existing simulators.
- Click on the Safari icon in the visionOS Home View to open Safari. Enter a URL in the navigation bar to go to a website.

Here’s how to get started using Safari’s developer tools on macOS:
- Open Safari on macOS.
- If you don’t see a Develop menu in the Menu Bar, you’ll need to enable Safari’s developer tools.
- Go to Safari > Settings > Advanced, and enable “Show features for web developers”.
- Now you can see “Apple Vision Pro (Simulator)” listed in the Develop menu.
Once you’ve completed this setup, you won’t need to repeat these steps again.
Open a web page in Safari in a visionOS simulator
You can use Safari in visionOS to navigate to a web page, but it’s likely you already have the page open in Safari on macOS. So instead, use this tip to quickly send web pages from macOS to the visionOS simulator:
- In Safari on macOS, go to the web page you’d like to test in the visionOS simulator.
- In the Safari menu bar, go to Develop > Open Page With > Apple Vision Pro.
The visionOS simulator comes to the front, and the web page opens in Safari. This also works for any number of other simulators for iPhone and iPad, which you can always install later.

Learn more about using the visionOS simulator.
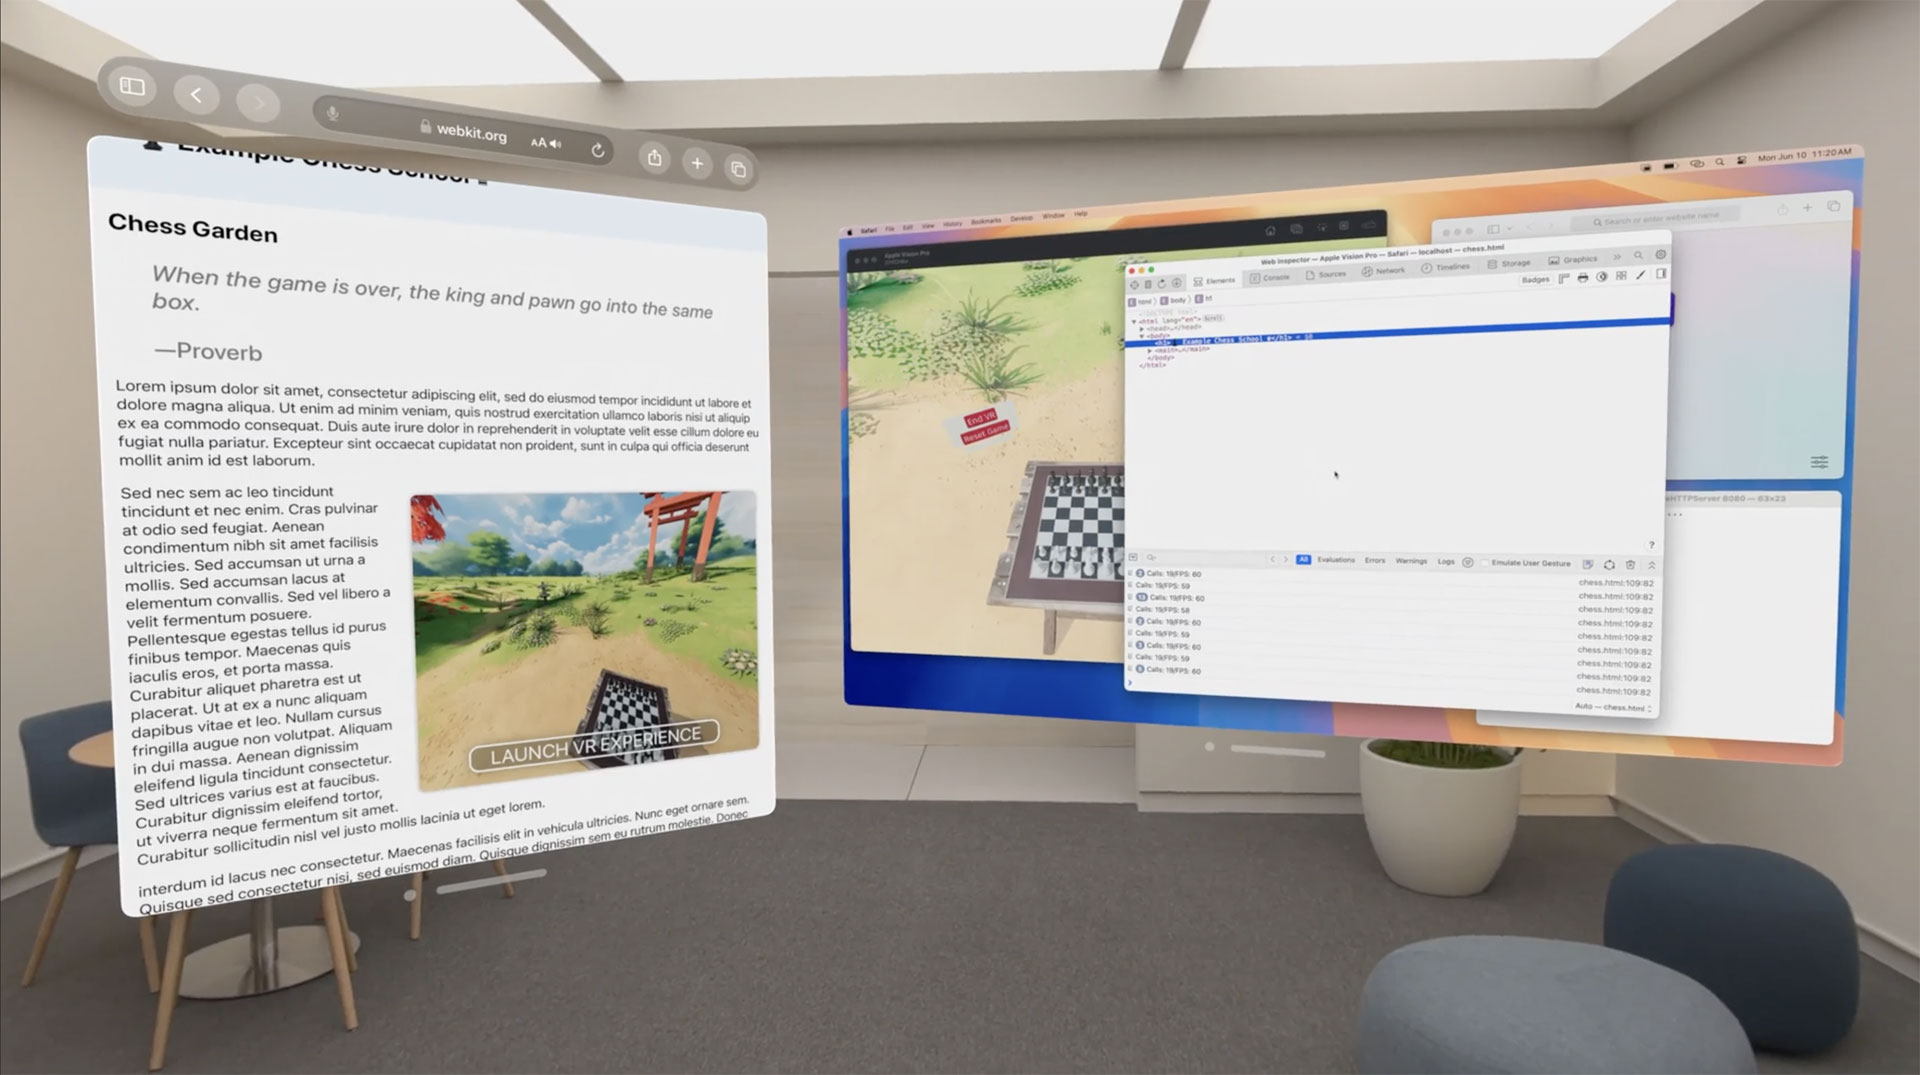
Inspect a visionOS simulator with Web Inspector
Web Inspector is instrumental when developing or troubleshooting web content in a simulator. To use it for a web page open in Safari in Apple Vision Pro Simulator. Click the Develop menu, select Apple Vision Pro (Simulator), and select the web page you want to inspect.

Web Inspector opens connected to the page loaded in Safari in the visionOS simulator. This brings all of the powerful inspection and debugging tools of Web Inspector to your web content loaded in Safari in any simulator. It also works for connecting to web pages loaded in Safari on iPhone, or iPad simulators.
Preview WebXR and with Feature Flags
Apple announced WebXR support with visionOS 2. If you’re using visionOS 1.2 in Apple Vision Pro or in the visionOS simulator on your Mac, you can still experience WebXR by turning on support for the testable version. You can also preview other new features like the <model> element.
To enable support for WebXR or the <model> element, from the the Home View, go to Settings > Apps > Safari > Advanced > Feature Flags and enable the feature flags for “HTML
Develop with Apple Vision Pro
Apple Vision Pro is a great place to work on a website. Use Mac Virtual Display to bring your Mac web development workflows into Apple Vision Pro. Test your site in Safari in visionOS, while debugging in Safari’s Web Inspector on macOS.
Start a Mac Virtual Display session
Use Apple Vision Pro as a private, portable 4K display for your Mac with Mac Virtual Display. Learn how in Use your Mac with Apple Vision Pro.
Enable Web Inspector for Apple Vision Pro
To get started connecting Safari in Apple Vision Pro with Web Inspector on macOS, you’ll need to go through a one-time set-up process that ensures only your Mac and your Apple Vision Pro have this kind of access to each other.
- In Safari on macOS, if the Develop menu is missing, enable features for web developers.
- Make sure both Apple Vision Pro and your Mac are connected to the same network.
- On Apple Vision Pro, open Settings > Apps > Safari > Advanced, and enable Web Inspector. Then open Settings > General > Remote Devices, and choose your Mac to prepare visionOS for pairing.
- On Mac, open the Develop menu. You should see your Apple Vision Pro listed. Choose “Use for Development…”
- A six-digit PIN code will appear in visionOS. Type it into the form on macOS.
Now your devices are paired. You can reconnect anytime. In Safari on macOS, Apple Vision Pro will now appear in the Develop menu anytime your Apple Vision Pro is on and unlocked.
Alternatively, you can pair with Xcode.
Inspect content from macOS Safari
Now you can inspect a web page that’s running in Safari in Apple Vision Pro using Web Inspector in Safari on macOS:
- In Safari in visionOS, go to the web page you want to inspect.
- On macOS, go to the Develop menu. You’ll see your Apple Vision Pro listed.
- Select the page you want to inspect from the submenu.
A Web Inspector window will open on macOS. Any changes you make will appear in Safari in visionOS.
For more information, read Inspecting visionOS.
Learn more
Learn more about how to download Simulator, pair Apple Vision Pro with Mac, or use Web Inspector while creating content for visionOS by watching Rediscover Safari developer features or by reading Inspecting visionOS.