Online Identity Verification with the Digital Credentials API
The rise of e-commerce in the past decade changed the way customers interact with businesses online, leading to new innovations and improved user experiences. But while these interactions made leaps, one area that’s remained generally analog is online identity verification. A common form of online verification is for a website to ask users to take a photo of a government-issued ID for verification. This requires people to locate their driver’s license or passport, find a suitable background to capture a clear image of that ID and then upload it. Often, to help ensure that the person uploading the ID is the same person to whom the identity card belongs, people are asked to capture a selfie with it that leads to increased abandonment rates. Beyond that, businesses have to rely on expensive and complex systems to verify these uploaded photos which come with limited privacy protections and expose users to an increased risk of identity theft.
Mobile IDs are changing this landscape, making online identity verification easier, more secure, and more private for everyone.
What Are Mobile IDs?
Mobile identity documents are secure, electronic versions of government-issued or verified credentials (like driver’s licenses, passports, or ID cards) that can be stored and presented on a smartphone or other device. One important format for mobile identity documents are called mdocs.
Mobile documents, also known as mDocs are defined by the ISO/IEC 18013-5 and ISO/IEC 18013-7 standard, which allow for the secure presentment of digital identity documents in-person and online. The standard also provides for multiple security and privacy capabilities including:
- Data minimization: Allows relying parties to request only the information that is needed to complete a transaction.
- Identity data integrity and anti-forgery: Cryptographically signed to prevent tampering and reduce the risk of identity theft during presentment.
- Device binding: use a device signature to protect against the cloning of an ID and the replay of an identity presentation.
- User data confidentiality: Session encryption helps ensure that all personally identifiable information (PII) exchanged between the mdoc and the relying party is encrypted.
Introducing Web Support for the Digital Credentials API
Starting in Safari 26 on macOS 26, iOS 26, and iPadOS 26, we’re introducing support for the W3C’s Digital Credentials API. This means websites can now request mobile IDs from Apple Wallet and third party Wallets directly from Safari and other WebKit-based browsers across your iPhone, iPad, Mac, and other devices.
How It Works: A Real-World Example
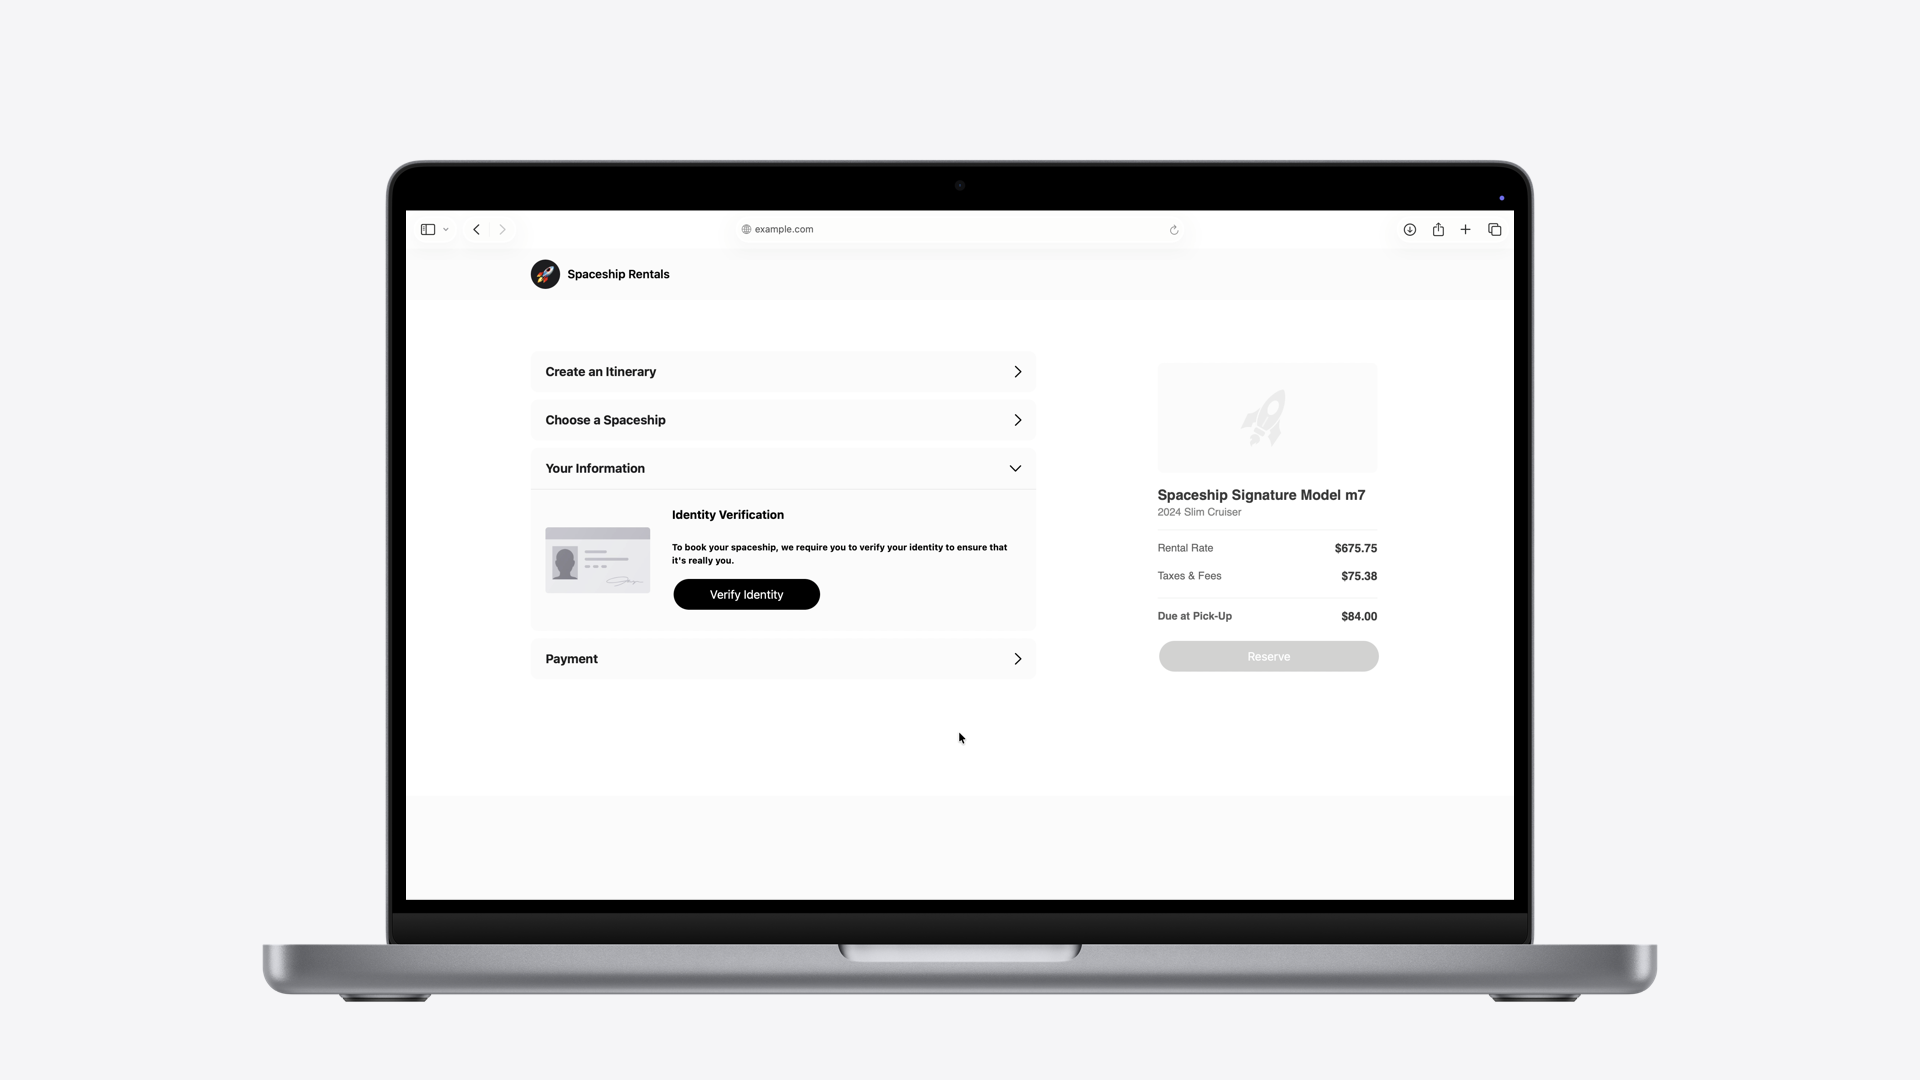
An individual user would like to create a verified account with a car rental company to access preferred benefits such as a “skip-the-counter” service. As part of that verified account setup, the user is asked to verify their identity online by presenting their mobile ID.
On Safari on an iPhone:
- User taps the “Verify Identity” button on the car rental’s website, which invokes the W3C’s Digital Credentials API.
- A system UI appears allowing the user to select their preferred digital identity document (e.g., California ID in Apple Wallet).
- A consent sheet displays the requested information, the website behind the request and whether the website intends to retain the requested information.
- The requested information is sent to the website only after the user reviews and authorizes with their biometric or passcode to do so.
On Safari on a Mac or iPad:
The process is equally straightforward on macOS and iPadOS, and also relies on digital identity documents stored on your iPhone:
- User taps the “Verify Identity” button on the car rental’s website, which invokes the W3C’s Digital Credentials API.
- User is prompted to continue on their nearby iPhone that is signed into the same Apple account.
- A consent sheet displays the requested information, the website behind the request and whether the website intends to retain the requested information.
- The requested information is sent to the website only after the user reviews and authorizes with their biometric or passcode to do so.
On other platforms:
Users can also present their mobile IDs across other standards compliant non-Apple platforms:
- User taps the “Verify Identity” button on the car rental’s website, which invokes the W3C’s Digital Credentials API.
- The browser presents a QR code allowing the user to open the camera app on their iPhone and scan it to continue the identity verification process.
- On the user’s iPhone, a consent sheet displays the requested information, the website behind the request and whether the website intends to retain the requested information.
- The requested information is sent to the website only after the user authorizes with their biometric or passcode to do so.
How the Digital Credentials API works
Presenting your Digital Credential in Safari follows international standards, ensuring interoperability so that any browser or platform adopting the same standards can accept it:
- W3C Digital Credentials API for the JavaScript API.
- ISO/IEC 18013-7 Annex C and ISO/IEC 18013-5 for the request format.
- FIDO CTAP protocol for cross-platform flows.
Understanding the Technical Flow
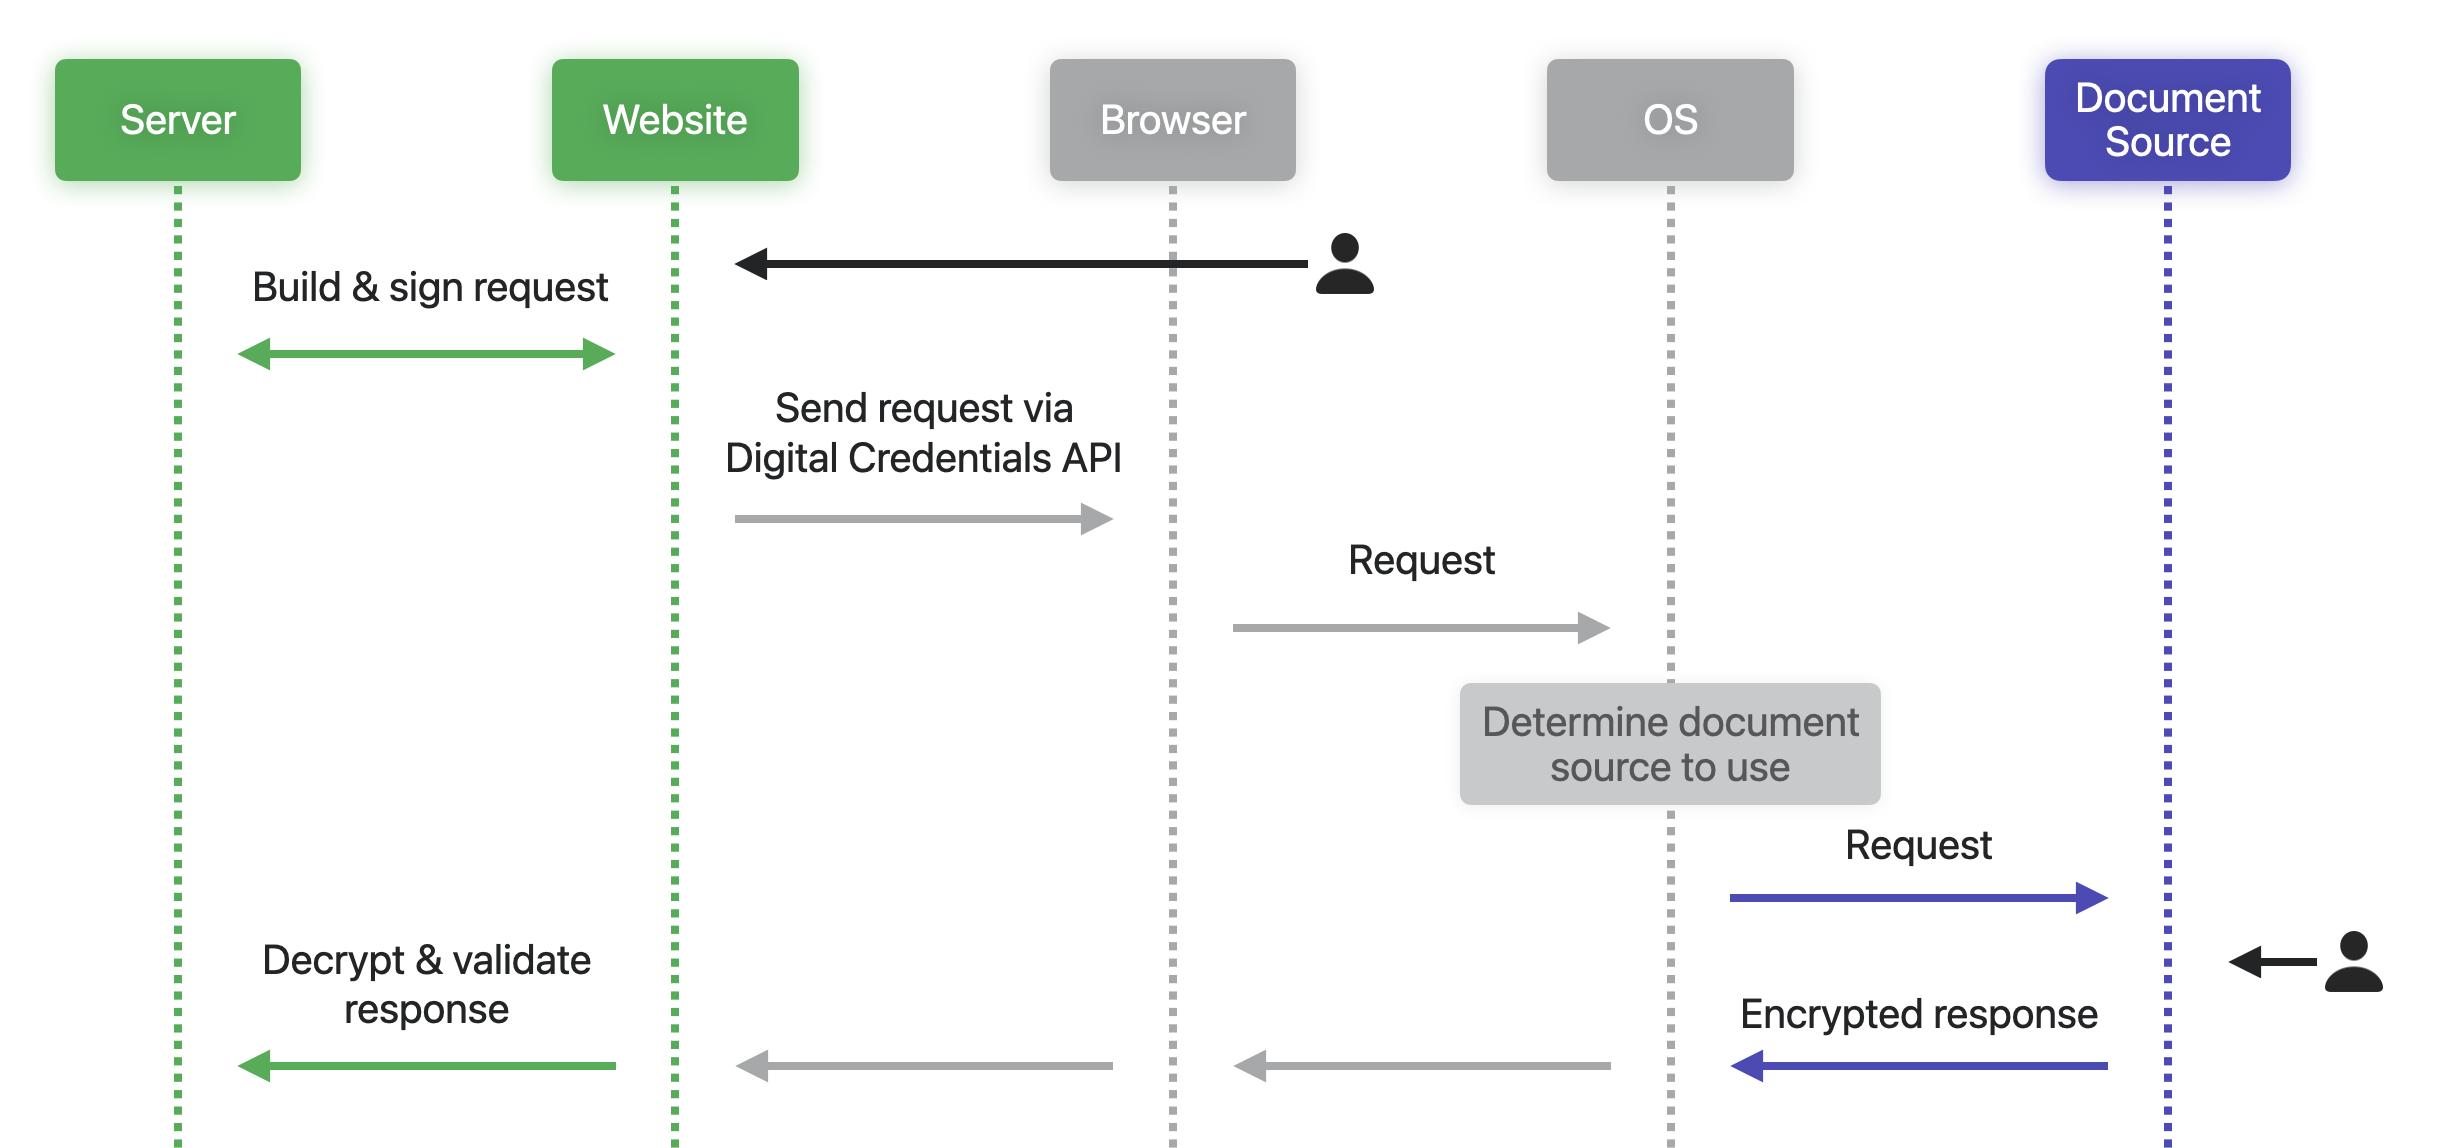
- User visits website: The request for a digital credential begins by some user action (e.g., pressing a “Verify Identity” button).
- Server builds the request: The website’s server creates and signs a document request.
- API call via JavaScript: The website calls the Digital Credentials API with the request.
- OS handles routing: The browser forwards the request to the operating system.
- Wallet selection UI: The OS determines available document sources (e.g., Apple Wallet or another app) and shows options to the user.
- User authorization: The selected app handles user consent and authorization.
- Encrypted response: An encrypted response (e.g., the request drivers license data) is sent back to the website.
- Decrypt and validate: The website’s server decrypts and checks the values are as expected in the response (see “Security: Trust but Verify” below).
For Website Developers: Getting Started
As a website developer looking to implement digital identity verification, there are three main steps to consider:
1. Building the Request
The website server needs to create a properly formatted request containing:
- Document type: What kind of document the website is requesting (e.g., driver’s license in the mdoc format).
- Required elements: Specific information the website needs (e.g., full name, age, etc.) and whether the website intends to retain this information.
- Encryption parameters: Keys and nonces for encryption and signing the response.
- Authentication structures: A signed
ReaderAuthstructure that contains information to help identify the website to document providers.
For more information about building and signing the request, see Requesting a mobile document on the web.
2. Making the API Call
Below is a reference to the Digital Credentials API that can be used as a starting point for making your own calls:
const requestData = {
  protocol: "org-iso-mdoc",
  data // Built on your server
};

try {
  // Gets back an encrypted credential
  const credential = await navigator.credentials.get({
    mediation: "required",
    digital: {
       requests: [ requestData ]
    }
  });
  // Send credential back to server for decryption
  await fetch("/verify", { method: "POST", body: credential };
} catch (error) {
  // Handle errors or fallback to alternative methods
}
Important: this API call must be triggered by a user gesture (like a button click) to prevent a website from requesting a user’s identity without user interaction. Like with most modern JavaScript APIs, this check is done automatically by the browser.
3. Processing the Response
When the server receives the response, it needs to:
- Decrypt the response using its own private key.
- Validate the issuer’s signature through the
IssuerAuthstructure as defined in ISO/IEC 18013-5. - Verify the authenticity of individual data elements by computing and comparing hash digests.
- Confirm the document came from the device it was issued to by validating the
DeviceAuthstructure.
The precise procedure required to perform these steps for processing the response is defined in ISO/IEC 18013-5.
Security: Trust but Verify
Security is paramount when dealing with identity information. The mdoc format as defined in ISO/IEC 18013-5 includes multiple layers of protection to detect, deter, and mitigate security risks:
Request Authentication: Websites identify themselves using certificates, so users know exactly who’s asking for their information.
End-to-End Encryption: Responses are encrypted using keys generated by the requesting website, preventing unauthorized actors from accessing the data.
Issuer Authentication: Digital signatures prove the authenticity of the identity data and prevent tampering.
Device Binding: mdoc authentication use a device signature to protect against the cloning of an ID and the replay of an identity presentation.
For App Developers
If you’re building an app that provides digital identity documents like a government licensing authority app or digital identity documents provider, you can integrate your app with Identity Document Services. This framework enables the presentment of identity documents on device and web browser support for the Digital Credentials API. Once authorized, a person can select your app during a identity documents request, where they can authorize the presentment of identification through a UI you create.
If instead you are an app developer who wants to request a digital identity document from your app, see Get started with the Verify with Wallet API.
Learn More and Next Steps
For a deeper dive into Digital Credentials implementation, we recommend watching this WWDC session: Streamline identity verification with Digital Credentials. This session covers how Digital Credentials can enhance online identity verification flows, explores website integration with the Digital Credentials API for requesting information from IDs in Wallet, and demonstrates how apps can provide their own identity documents for online verification using the IdentityDocumentServices framework.
Next Steps
Ready to get started? Here’s what you need to do:
For Web Developers:
- Register with Apple Business Connect to receive certificates for requesting IDs from Apple Wallet.
- Check with other document providers about their specific onboarding requirements.
- Review the ISO standards mentioned in this post for implementation details.
- Follow the Requesting a mobile document on the web guide to get started with your implementation.
For App Developers wanting to integrate with Identity Document Services:
- Implement the Identity Document Provider app extension in your iOS app.
- Study the IdentityDocumentServices framework documentation.
- Follow the Implementing as an identity document provider guide for native app integration.